MICROSOFT POWER POINT
To get up to speed with PowerPoint, it helps to understand the layout of the app. Let's walk through the key menu options so that you can learn PowerPoint quickly. If you understand the way that the app is laid out, you're likely to find any feature you need quickly.
Let's take a look at the key parts of PowerPoint's interface.
1. The Ribbon
The ribbon menu is found across many of Microsoft's apps, such as Word, Excel, and PowerPoint. It lives above the main area of the application.

The ribbon contains a series of tabs that you can switch between. Each of these have a unique set of tools to work with your presentation differently. When you switch tabs on the ribbon, you'll see new buttons and options to modify your presentation:
- File - save, share, and export your presentation.
- Home - a general purpose collection of the most common tools that you'll use in PowerPoint.
- Insert - an all-in-one tool to add every imagine-able type of content, such as tables, pictures, charts, video, and more.
- Design - controls the overall look and feel of your presentation with theme and style settings.
- Transitions - add animations when you switch slides.
- Animations - controls the order and style that objects will enter or exit your slide with.
- Slide Show - control settings related to the way your presentation appears when sharing it with an audience.
Now that you understand the layout, you have a better idea of how you can jump to the feature you need. Let's dive a bit deeper into how you can use several of these key tabs.
2. The Home Tab
Use it for: a general selection of the most popular tools in PowerPoint.
I usually stay on the Home tab when I'm working in PowerPoint. The reason is because it has practically every tool you need. From adding a new slide to changing text and paragraph settings, the Home tab is the default for most users.

3. The Insert Tab
When you're working on adding content to a slide, the Insert tab has every possible tool to add new content to a slide. Choose one of these types of objects to add it to the slide.

4. Views
PowerPoint has a variety of views which are simply different ways to work with the same presentation. You can change the view in order to get a different perspective on your content.
Use views for a different way to edit and build your PowerPoint presentation.

In the screenshot below, you can see the difference between the default Normal view and Slide Sorter view. Normal view shows each slide front and center, while slide sorter view creates thumbnails that you can drag and drop to reorder the presentation.

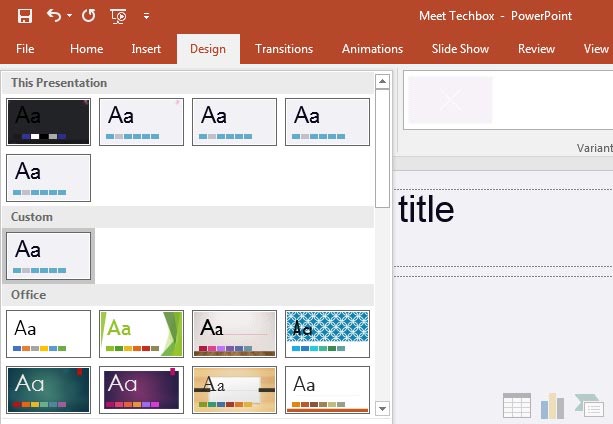
5. The Design Tab
An attractive presentation can really grab your audience's attention. We use themes and styles in PowerPoint to add visual appeal to the presentation, and the Design tab really controls these settings.

On the Design tab, you can click on one of the themes to restyle the presentation. Or, try out a different Style thumbnail to overhaul the color theme.
The Steps to Building a PowerPoint
We've tackled the interface of PowerPoint, so you should be feeling pretty comfortable with how to get around the app. Now, let's talk about the actions you'll find yourself using repeatedly and how you can do that in PowerPoint.
1. How to Add Slides
Think of slides as the individual units in your presentation that you can fill with content. To insert a new slide, go to the Insert tab on PowerPoint's ribbon. Then, click on the New Slide button to add a new slide to your presentation.

Each of the thumbnails that you'll see on the sidebar represents a slide. Then, you'll add content to each slide.
There's no practical limit to the number of slides that your PowerPoint file can contain. However, you should consider how many slides it actually takes to make your point. It's often the
2. How to Add Content
Content is what defines each and every slide. PowerPoint accommodates a wide range of content like text, graphs, tables, charts, and more.
The easiest way to add content is to start off by choosing a Layout, which you can choose from the Home tab.

These layouts have content boxes that are easy to add your own content to. Simply choose a layout, and then start adding your content.
3. How to Choose a Theme and Style
After you build out your presentation's content, it's a great idea to think about adding visual style. For this, you'll jump over to the Design tab, and click on one of the thumbnails for a theme.
Using a PowerPoint theme is the preferred alternative to adding backgrounds, color and type styles to each and every slide. Changing the theme typically will adjust the entire presentation simultaneously. This greatly reduces the time involved with building a presentation.
With just these three steps, you have the repeatable sequence of actions needed to build a presentation.
How to Power up PowerPoint
With every creative app I've ever learned, there are always those insider tricks of the trade that you learn many months later. They make you wish that you had known them all along and think about the many hours you wasted on the learning curve.
PowerPoint is no exception to this rule, and it's especially important that you can cut to the chase when you're rushing to prepare for your presentation.
The best way to save time on your presentation is to start with a pre-built PowerPoint theme. And you can find those on Envato Elements, which is an unlimited download service for creatives.

Now, most of the files that you'll grab from the Elements PPTX themes will appear to be finished presentations. You might be wondering how to use these pre-built presentations for your own needs.
To use Elements themes, it's really all about cutting it down to the slide designs that you'll use. A premium theme is really about the ideas that are included as part of it. Simply use these ideas as starting points that you can add your own content to.

Again, the value of Elements is that you can download as many files as you want while you're a subscriber. And if you stop subscribing, you'll still have the right to use the creative assets you grabbed. It's much faster than building every slide from scratch.
Tools for Presenters
The content and design will vary greatly from one presentation next. However, no matter what the goal of your presentation is, there are common tools that every presenter can benefit from using.
Let's focus on the most valuable tools for speakers in this PowerPoint tutorial. I always mention these tools as a way to build confidence and comfort for presenters.
1. Speaker Notes
Forget writing out note cards or keeping a printed outline nearby. Speaker notes are a way to add the things you need to say to each slide.
Speaker notes are added to each individual slide, and the best way to add them is from Normal view. Click on Notes below the presentation area and type your slide-specific notes.

Speaker notes will show up in printed copies of your presentation, so it's easier to build them into PowerPoint instead of scribbling note cards you may lose.
2. Presenter View
Another feature that is a must-use is Presenter View, which is perfect for two screen setups while presenting. While your audience will see the presentation you've built on the projector or LCD screen, you'll have your own private view with speaker notes, upcoming slides and more.
Turn on Presenter View from the slideshow tab by clicking Use Presenter View.

Check out a full guide below on getting the most from Presenter View:

3. Spelling and Grammar Check
There's nothing worse than missing a key typo before you give your presentation. To avoid this problem, it's a great help to run a spelling and grammar check before you give your presentation.
To check for common spelling issues, simply jump to the Review tab and click Spelling. PowerPoint will check for the most common issues and allow you to correct them as needed.
Comments
Post a Comment